Deploying Your App
Overview
This guide covers deploying your app to the Apple App Store and Google Play Store using Expo Application Services (EAS).
Understanding Build Types
When you run npx expo start, you're running a Development Build that requires a local server connection. To test on your physical device without a computer, you need to build a Production APK (Android) or IPA (iOS). See the Development Build vs Production Build section below.
Development Build vs Production Build
What is a "Development Build"?
When you see this screen on your device:
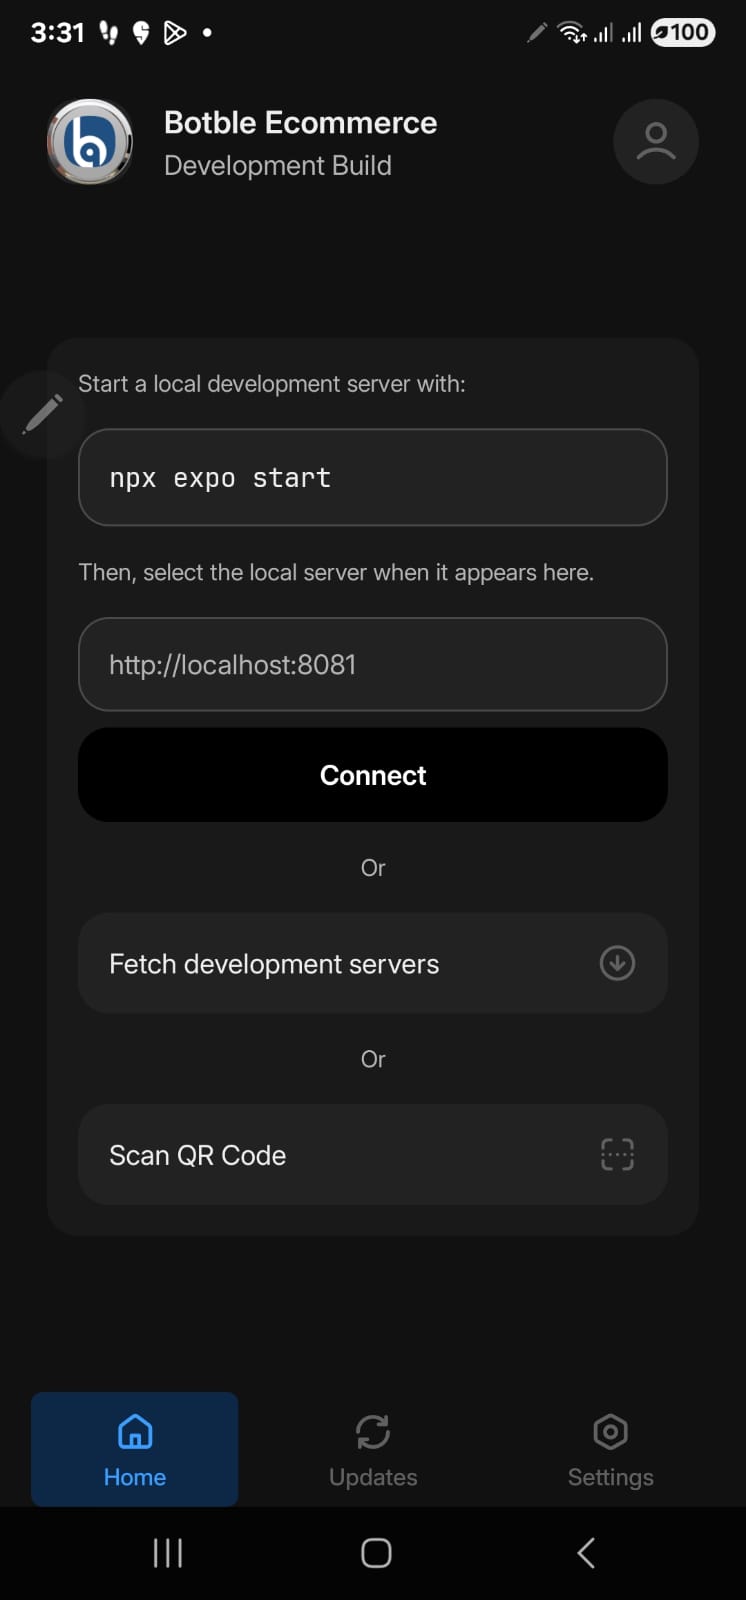
This means you installed a development build. Development builds:
- Require a local development server running (
npx expo start) - Need your computer and phone on the same network
- Are for developers to test code changes with hot reload
- Cannot work standalone - they always need the dev server
What You Need: Production Build (APK/IPA)
To use the app without a development server (like a regular app), you need a production build:
- Android: APK file - can be installed directly on any Android device
- iOS: IPA file - requires TestFlight or App Store distribution
Quick Comparison
| Feature | Development Build | Production Build (APK/IPA) |
|---|---|---|
| Needs dev server | Yes | No |
| Hot reload | Yes | No |
| Standalone use | No | Yes |
| For end users | No | Yes |
| Build location | Local machine | EAS cloud or local |
Prerequisites
Required Accounts
Apple Developer Account ($99/year) - Optional for APK testing
- developer.apple.com
- Required only for iOS App Store publishing
Google Play Developer Account ($25 one-time) - Optional for APK testing
- play.google.com/console
- Required only for Google Play Store publishing
Expo Account (free) - Required for all builds
- expo.dev
- Required to use EAS Build
Setting Up EAS (Expo Application Services)
Step 1: Create an Expo Account
- Go to expo.dev/signup
- Choose one of these options:
- Sign up with Email: Enter your email and create a password
- Sign up with GitHub: Click "Continue with GitHub"
- Sign up with Google: Click "Continue with Google"
- Verify your email if required
- Complete your profile
Step 2: Install EAS CLI
Open your terminal and run:
npm install -g eas-cliStep 3: Login to EAS
eas loginYou'll see a prompt like this:
Log in to EAS with email or username (exit and run eas login --help to see other login options)
? Email or username ›
Enter your Expo account credentials:
- Type your email or username and press Enter
- Type your password and press Enter
Alternative login methods:
# Login with SSO (Google/GitHub)
eas login --sso

# Check if you're already logged in
eas whoami
Step 4: Verify Login
eas whoamiThis should display your username if logged in successfully.
Environment Variables (Critical)
Important - Read Before Building
Your .env file is gitignored and will NOT be included in EAS builds. You must configure environment variables using EAS Secrets before building. Skipping this step will result in a black screen when you open the app.
Why .env Doesn't Work with EAS
| Source | Local Dev | EAS Build |
|---|---|---|
.env file | Yes | No |
| EAS Secrets | No | Yes |
eas.json env | No | Yes |
EAS Build runs in the cloud and only has access to:
- Your Git repository
- EAS Secrets
Since .env is gitignored (for security), EAS cannot read it.
Step 1: Set Environment Variables with EAS Secrets
Required variables:
eas secret:create --name API_BASE_URL --value "https://your-website.com"
eas secret:create --name API_KEY --value "your-api-key"
Optional but recommended:
eas secret:create --name APP_NAME --value "Your App Name"
eas secret:create --name APP_ENV --value "production"
Bulk import from .env (recommended for many variables):
cat .env | xargs -L 1 eas secret:createThis creates one secret per variable automatically.
Step 2: Verify Secrets
eas secret:listYou should see your variables listed.
Managing Secrets
# List all secrets
eas secret:list

# Delete a secret
eas secret:delete API_BASE_URL

# Update a secret (delete and recreate)
eas secret:delete API_BASE_URL
eas secret:create --name API_BASE_URL --value "https://new-url.com"
Environment Variables Reference
| Variable | Required | Description |
|---|---|---|
API_BASE_URL | Yes | Your website URL (without /api/v1) |
API_KEY | Yes | API key from backend API settings |
APP_NAME | No | App display name |
APP_ENV | No | production, staging, or development |
APP_VERSION | No | App version (default: 1.0.0) |
PRIMARY_COLOR | No | Brand color hex without # (default: 2d5481) |
DEFAULT_LANGUAGE | No | Language code: en, ar, vi, es, fr |
Alternative: Configure in eas.json
You can also set env variables directly in eas.json:
{
  "build": {
    "production": {
      "env": {
        "API_BASE_URL": "https://your-website.com",
        "API_KEY": "your-api-key",
        "APP_NAME": "Your App Name",
        "APP_ENV": "production"
      }
    }
  }
}
EAS Secrets vs eas.json
- EAS Secrets: More secure, not committed to Git, managed via CLI
- eas.json env: Simpler, but committed to Git (visible in repository)
For API keys and sensitive data, use EAS Secrets.
Best Practices Summary
| Purpose | Method |
|---|---|
| Local development | .env file |
| Production builds | EAS Secrets |
| Non-secret values | eas.json env or EXPO_PUBLIC_* |
Common Mistakes
| Mistake | Result |
|---|---|
| Not setting EAS Secrets before build | Black screen on app launch |
Expecting EAS to read .env | App has no API configuration |
Committing .env to Git | Security risk |
Building APK for Android Testing
Quick Start for Android Testing
If you just want to test your app on an Android device without a development server, follow this section. No Google Play account needed!
There are two ways to build an APK:
- Local Build (Recommended) - Build directly on your machine using Gradle
- EAS Cloud Build - Build on Expo's servers
Option 1: Local APK Build (Recommended)
This method builds the APK locally on your machine without requiring an Expo account or EAS subscription.
Prerequisites
- Node.js (v18 or higher)
- Java JDK (v17 recommended)
- Android SDK (via Android Studio or standalone)
Verify Java Installation
java -version
# Should show java 17.x.x or higher
Step 1: Install Dependencies
npm install --legacy-peer-depsStep 2: Configure Environment
Edit .env file with your configuration:
API_BASE_URL=https://your-website.com
API_KEY=your-api-key
APP_NAME=Your App Name
Step 3: Generate Native Android Project
npx expo prebuild --platform android --cleanThis creates the android/ folder with native Android project files.
Step 4: Generate Release Keystore
Create a keystore for signing the APK:
keytool -genkeypair \
    -v \
    -storetype PKCS12 \
    -keystore android/app/release.keystore \
    -alias release \
    -keyalg RSA \
    -keysize 2048 \
    -validity 10000 \
    -storepass your_password_here \
    -keypass your_password_here \
    -dname "CN=Your Name, OU=Mobile, O=Your Company, L=City, ST=State, C=US"
Keep Your Keystore Safe
Store your keystore file and passwords securely. You'll need the same keystore to update your app in the future. If you lose it, you won't be able to publish updates to the same app on the Play Store.
Step 5: Configure Signing
Add signing configuration to android/gradle.properties:
# Release signing configuration
MYAPP_UPLOAD_STORE_FILE=release.keystore
MYAPP_UPLOAD_KEY_ALIAS=release
MYAPP_UPLOAD_STORE_PASSWORD=your_password_here
MYAPP_UPLOAD_KEY_PASSWORD=your_password_here
Add signing config to android/app/build.gradle. Find the android { block and add:
android {
    // ... existing config ...

    signingConfigs {
        release {
            if (project.hasProperty('MYAPP_UPLOAD_STORE_FILE')) {
                storeFile file(MYAPP_UPLOAD_STORE_FILE)
                storePassword MYAPP_UPLOAD_STORE_PASSWORD
                keyAlias MYAPP_UPLOAD_KEY_ALIAS
                keyPassword MYAPP_UPLOAD_KEY_PASSWORD
            }
        }
    }

    buildTypes {
        release {
            signingConfig signingConfigs.release
            // ... existing release config ...
        }
    }
}
Step 6: Build the App
Choose the appropriate build command based on your needs:
For Testing (APK):
cd android
./gradlew assembleRelease
The APK will be generated at:
android/app/build/outputs/apk/release/app-release.apkFor Google Play Store (AAB):
cd android
./gradlew bundleRelease
The AAB will be generated at:
android/app/build/outputs/bundle/release/app-release.aabAPK vs AAB
| Format | Use Case |
|---|---|
| APK | Direct device installation, testing, distribution outside Play Store |
| AAB | Google Play Store submission (required since August 2021) |
Step 7: Verify Signature (Optional)
For APK:
# Using jarsigner
jarsigner -verify android/app/build/outputs/apk/release/app-release.apk

# Or using apksigner (if Android SDK build-tools is in PATH)
apksigner verify --print-certs android/app/build/outputs/apk/release/app-release.apk
For AAB:
jarsigner -verify android/app/build/outputs/bundle/release/app-release.aabStep 8: Distribution
For Testing (APK):
Transfer the APK to your Android device and install it:
- Email it to yourself
- Upload to cloud storage (Google Drive, Dropbox)
- Use
adb installif device is connected via USB:
adb install android/app/build/outputs/apk/release/app-release.apkFor Google Play Store (AAB):
- Go to Google Play Console
- Select your app (or create a new one)
- Go to Release → Production (or Testing track)
- Click Create new release
- Upload the
app-release.aabfile - Complete the release notes and submit for review
Troubleshooting Local Build
"SDK location not found" error:
Create android/local.properties with your Android SDK path:
sdk.dir=/Users/YOUR_USERNAME/Library/Android/sdk"JAVA_HOME is not set" error:
Set JAVA_HOME environment variable:
export JAVA_HOME=$(/usr/libexec/java_home -v 17)Build fails with memory error:
Increase Gradle memory in android/gradle.properties:
org.gradle.jvmargs=-Xmx4096m -XX:MaxMetaspaceSize=1024mOption 2: EAS Cloud Build
Build on Expo's cloud servers without local Android SDK setup.
Step 1: Configure EAS Build
Run this command in your project folder:
eas build:configureThis creates an eas.json file in your project and updates app.json with the project ID.
Verify projectId Location
After running eas build:configure, verify that the projectId is in the correct location in your app.json:
Correct - inside expo.extra.eas:
{
  "expo": {
    "extra": {
      "eas": {
        "projectId": "your-project-id"
      }
    }
  }
}
Incorrect - directly under expo.eas:
{
  "expo": {
    "eas": {
      "projectId": "your-project-id"
    }
  }
}
If the projectId is in the wrong location, you'll get Cannot read properties of undefined (reading 'projectId') error. See Troubleshooting for details.
Step 2: Update eas.json for APK Build
Open eas.json and update it to include APK output:
{
  "cli": {
    "version": ">= 5.0.0"
  },
  "build": {
    "development": {
      "developmentClient": true,
      "distribution": "internal"
    },
    "preview": {
      "distribution": "internal",
      "android": {
        "buildType": "apk"
      }
    },
    "production": {
      "env": {
        "APP_ENV": "production"
      }
    }
  },
  "submit": {
    "production": {}
  }
}
Important: Set APP_ENV for Production
Always set APP_ENV=production in your production build profile. This disables the license validation dialog that only appears in development mode. Without this setting, users may see a "License Required" alert on app startup.
Step 3: Build the APK
eas build --platform android --profile previewWhat happens:
- EAS uploads your project to cloud servers
- Build runs on Expo's servers (no local Android SDK needed!)
- You'll see a progress bar and build URL
- When complete, download link appears
Step 4: Download and Install APK
- Wait for build to complete (usually 10-15 minutes for first build)
- Download the APK from the link in terminal or from expo.dev → Your Project → Builds
- Transfer APK to your Android device (email, cloud drive, USB)
- On Android device:
- Open the APK file
- Allow installation from unknown sources if prompted
- Install and open the app
First Time Build
The first build takes longer as EAS sets up credentials. Subsequent builds are faster.
Troubleshooting EAS Build
"Not logged in" error:
eas login"No project found" error:
eas build:configureBuild fails with credential error:
eas credentials --platform androidInitial Setup
Step 1: Configure EAS
eas build:configureThis creates eas.json in your project:
{
  "cli": {
    "version": ">= 5.0.0"
  },
  "build": {
    "development": {
      "developmentClient": true,
      "distribution": "internal"
    },
    "preview": {
      "distribution": "internal"
    },
    "production": {
      "env": {
        "APP_ENV": "production"
      }
    }
  },
  "submit": {
    "production": {}
  }
}
TIP
The APP_ENV=production setting is critical - it disables the development-only license check dialog.
Step 2: Update app.json
{
  "expo": {
    "name": "Your Store Name",
    "slug": "your-store",
    "version": "1.0.0",
    "ios": {
      "bundleIdentifier": "com.yourcompany.yourstore",
      "buildNumber": "1"
    },
    "android": {
      "package": "com.yourcompany.yourstore",
      "versionCode": 1
    }
  }
}
Building for iOS
Build for App Store
eas build --platform ios --profile productionFirst time setup:
- EAS will ask to create Apple credentials
- Follow the prompts to authenticate
Build for TestFlight (Preview)
eas build --platform ios --profile previewSubmit to App Store
eas submit --platform iosBuilding for Android
Build for Play Store
eas build --platform android --profile productionFirst time:
- Creates upload keystore (keep this safe!)
- Follow prompts for configuration
Build APK (for testing)
Add to eas.json:
{
  "build": {
    "preview": {
      "android": {
        "buildType": "apk"
      }
    }
  }
}
Then:
eas build --platform android --profile previewSubmit to Play Store
eas submit --platform androidBuild Both Platforms
eas build --platform all --profile productionVersion Management
Before Each Release
Update in app.json:
{
  "expo": {
    "version": "1.1.0",
    "ios": {
      "buildNumber": "2"
    },
    "android": {
      "versionCode": 2
    }
  }
}- version: User-visible version (1.0.0, 1.1.0, etc.)
- buildNumber/versionCode: Internal build number (increment each build)
App Store Listings
Required Assets
- Screenshots: Multiple sizes for different devices
- App Icon: 1024x1024 PNG
- Description: Short and long descriptions
- Keywords: Relevant search terms
- Privacy Policy URL: Required for both stores
iOS App Store
- Go to App Store Connect
- Create new app
- Fill in app information
- Upload build from EAS
- Submit for review
Google Play Store
- Go to Google Play Console
- Create new app
- Complete store listing
- Upload AAB from EAS
- Submit for review
Environment Variables for Builds
Using EAS Secrets
eas secret:create --name API_BASE_URL --value "https://mystore.com"
eas secret:create --name API_KEY --value "your-api-key"
eas secret:create --name APP_NAME --value "Your Store Name"
In eas.json
{
  "build": {
    "production": {
      "env": {
        "APP_ENV": "production",
        "API_BASE_URL": "https://mystore.com",
        "API_KEY": "your-api-key",
        "APP_NAME": "Your Store Name"
      }
    }
  }
}
Required: APP_ENV=production
Always include APP_ENV=production in your production build. This is essential to disable the license validation dialog. Forgetting this will cause a "License Required" popup to appear when users open your app.
Over-the-Air Updates
Update JavaScript without app store review:
eas update --branch production --message "Bug fixes"Configure in app.json:
{
  "expo": {
    "updates": {
      "url": "https://u.expo.dev/your-project-id"
    },
    "runtimeVersion": {
      "policy": "sdkVersion"
    }
  }
}
Troubleshooting
Build Failed
- Check build logs on expo.dev
- Verify app.json configuration
- Ensure valid credentials
Submission Rejected
Common reasons:
- Missing privacy policy
- Incomplete metadata
- Guideline violations
- Bug reports from review
Credentials Issues
# Clear credentials and reconfigure
eas credentials
Deployment Checklist
Before Submission
- [ ] Test on real devices
- [ ] Verify all features work
- [ ] Check performance
- [ ] Review app size
- [ ] Update version numbers
- [ ] Prepare store listings
- [ ] Create screenshots
- [ ] Write descriptions
- [ ] Set up privacy policy
After Submission
- [ ] Monitor review status
- [ ] Respond to reviewer questions
- [ ] Plan next updates
Need Help?
- Check EAS Documentation
- Read the Troubleshooting Guide
- Contact support for assistance