Invoices
The invoice system generates professional, branded invoices for orders with customizable templates and comprehensive order details.
Overview
Shofy's invoice system includes:
- Automatic generation - Create invoices when orders are completed
- Manual generation - Generate invoices on-demand for any order
- Customizable templates - Multiple invoice layouts with theme customization
- PDF export - Download and print invoices
- Company branding - Add logo, company details, and tax information
- Invoice numbering - Unique invoice codes with custom prefix/suffix
- Multi-currency support - Display amounts in order currency
- Tax breakdown - Detailed tax components by rate
Accessing Invoices
Navigate to Ecommerce -> Invoices in the admin panel.
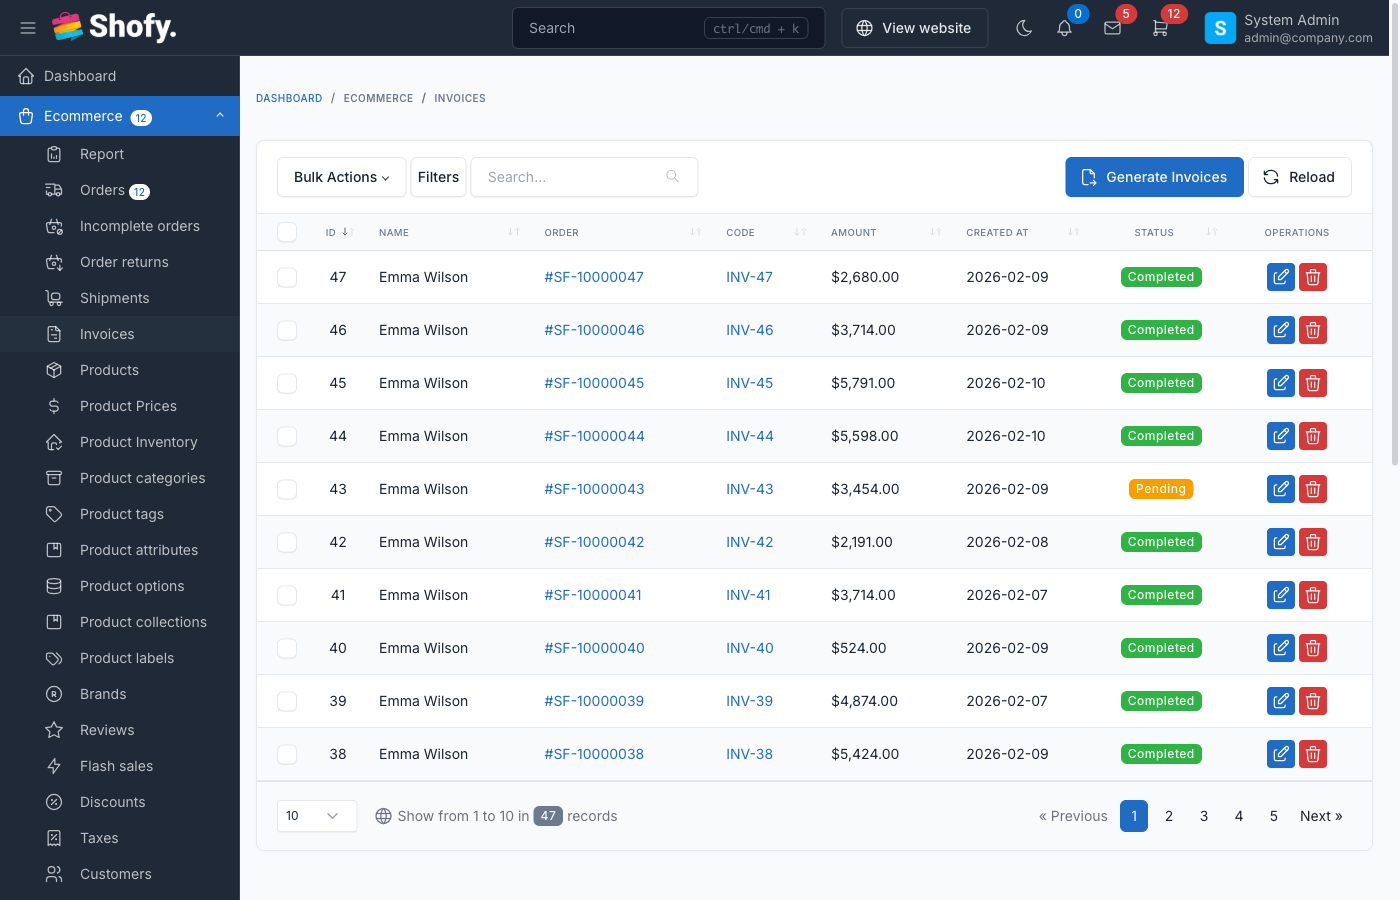
The invoices table displays:
- Invoice code
- Customer name
- Order code
- Amount
- Status
- Creation date
- Actions (View/Download/Delete)
Invoice Generation
Automatic Generation
Configure automatic invoice generation:
- Navigate to
Ecommerce->Settings->Invoice - Enable Generate invoice automatically after order is created
- Save settings
When enabled:
- Invoices generated immediately when order is created
- Or generated when order status changes to "Completed" (depends on configuration)
TIP
Automatic generation ensures all completed orders have invoices without manual intervention.
Manual Generation
To manually generate an invoice for an order:
Method 1: From Order Details
- Open order details page
- Click Generate Invoice button
- Invoice created and linked to order
Method 2: Bulk Generation
- Navigate to
Ecommerce->Invoices - Click Generate Invoices button
- System generates invoices for all completed orders without invoices
- Confirmation shows number of invoices created
WARNING
Generate Invoice button only appears on orders without existing invoices.
Invoice Availability
Invoices are available to customers when:
- Invoice exists - Invoice has been generated for the order
- Order is confirmed - Order status is confirmed (unless setting allows unconfirmed)
- Not canceled - Order status is not "Canceled"
Invoice Until Confirmed Setting
At Ecommerce -> Settings -> Invoice:
Disable invoice until order is confirmed
- When enabled: Customers cannot view invoices until admin confirms order
- When disabled: Customers can view invoices immediately after generation
Use this to:
- Verify order details before sharing invoice
- Prevent premature invoice distribution
- Control customer access timing
Viewing & Downloading Invoices
From Order Details
- Open order details page
- Scroll to invoice section
- Click action:
- View - Opens invoice in browser
- Download - Downloads PDF file
- Print - Opens print dialog
From Invoice List
- Navigate to
Ecommerce->Invoices - Find invoice in list
- Click View or Download icon
Customer Access
Customers can view/download invoices from:
- Order confirmation email (if invoice is generated)
- Order details in their account
- Order tracking page (if accessible)
TIP
Invoices are accessible via secure URLs that include order token for authentication.
Invoice Information
Standard Fields
Every invoice includes:
Invoice Header
- Invoice code (unique identifier)
- Invoice date
- Order code (reference)
- Payment status
Company Information (Your store)
- Company name
- Company logo
- Company address
- Company phone
- Company email
- Tax ID (if configured)
Customer Information
- Customer name
- Customer email
- Customer phone
- Shipping address
- Tax ID (if provided by customer)
Payment Information
- Payment method
- Transaction ID (if available)
- Payment status
Order Items
- Product name with SKU
- Product options/variations
- Quantity
- Unit price
- Tax amount per item
- Line total
Amounts Summary
- Subtotal (before tax and shipping)
- Tax amount (by tax class)
- Shipping cost
- Discount amount (if applied)
- Total amount
Additional Details
- Order notes/description
- Coupon code (if used)
- Shipping method
- Payment method
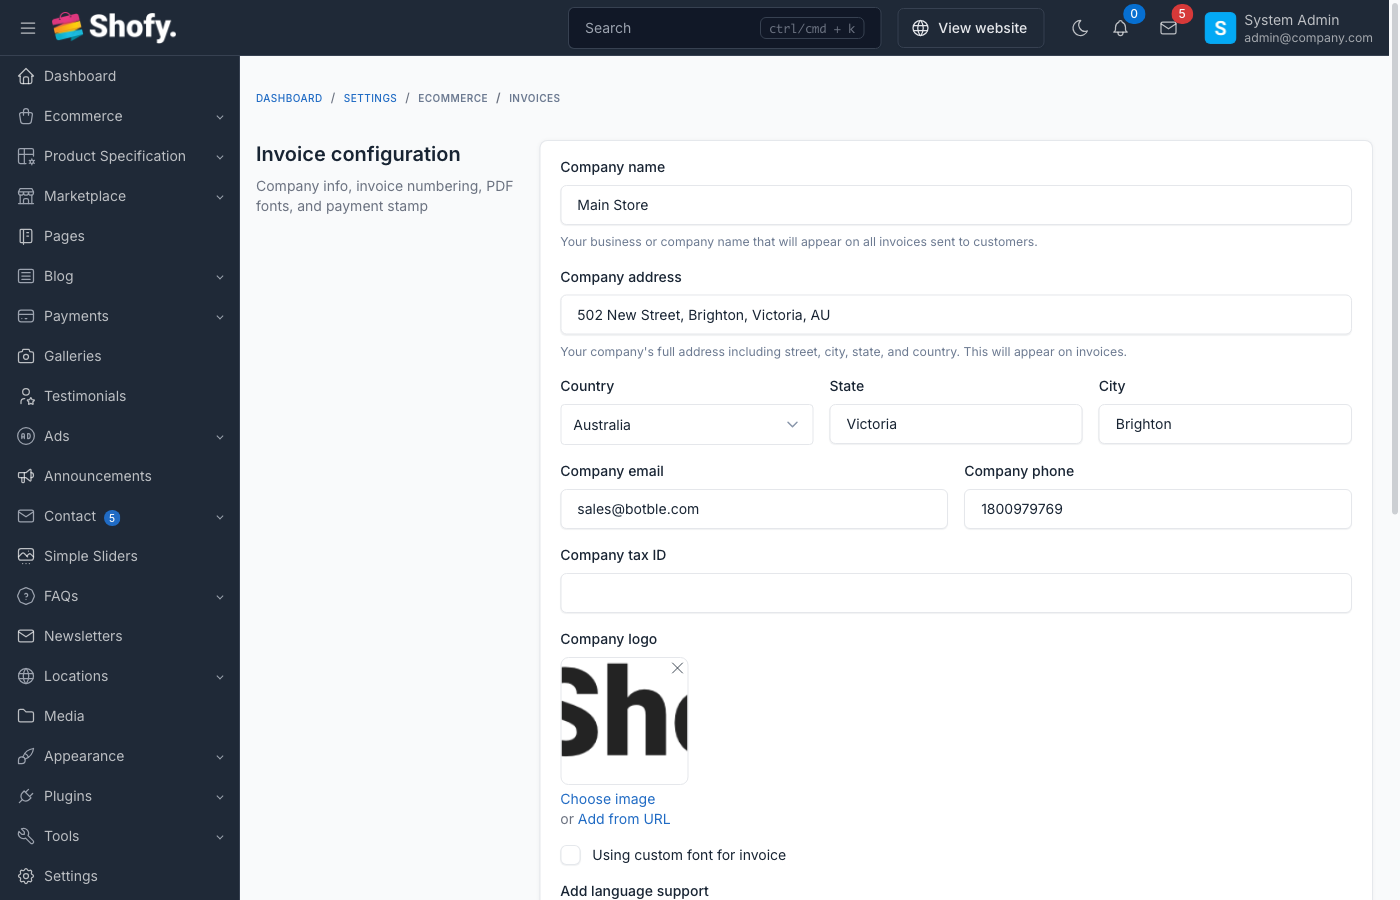
Invoice Configuration
Navigate to Ecommerce -> Settings -> Invoice to configure:
Basic Settings
| Setting | Description | Example |
|---|---|---|
| Invoice code prefix | Text before invoice number | "INV-" |
| Invoice code suffix | Text after invoice number | "-2024" |
| Generate automatically | Auto-create invoices | Enabled |
| Disable until confirmed | Hide until order confirmed | Enabled |
Invoice Code Format:
[PREFIX][NUMBER][SUFFIX]

Examples:
INV-000123
INVOICE-000456-2024
2024-001
Company Information
Configure your store's information shown on invoices:
At Settings -> General:
- Company name
- Company logo
- Company phone
- Company email
- Company address
At Ecommerce -> Settings -> Tax:
- Company tax code/VAT
Logo Recommendations
- Format: PNG or JPG
- Dimensions: 200x80 pixels optimal
- Background: Transparent PNG preferred
- Size: Under 500KB
Invoice Templates
Available Templates
Shofy includes multiple invoice templates:
- Default - Clean, professional layout
- Compact - Space-efficient design
- Detailed - Comprehensive information display
Navigate to Ecommerce -> Settings -> Invoice Templates to:
- Preview templates
- Select active template
- Customize template HTML
- Add custom CSS
Customizing Templates
To customize invoice appearance:
- Navigate to
Ecommerce->Settings->Invoice Templates - Select template to customize
- Edit template:
- HTML Content - Modify layout and structure
- Custom CSS - Add styling rules
- Use template variables for dynamic content
- Click Preview to test changes
- Save customization
Available Template Variables:
| Variable | Description |
|---|---|
invoice.code | Invoice code |
invoice.created_at | Invoice date |
order.code | Order code |
order.created_at | Order date |
customer.name | Customer name |
customer.email | Customer email |
customer.phone | Customer phone |
customer.address | Shipping address |
items | Order items list |
subtotal | Order subtotal |
tax_amount | Tax total |
shipping_amount | Shipping cost |
discount_amount | Discount total |
total | Grand total |
company.* | Company information |
payment.* | Payment details |
For complete template customization, edit the invoice template in the admin settings as described above.
Resetting Templates
To restore default template:
- Navigate to invoice templates
- Select customized template
- Click Reset to Default
- Confirm reset
- Customizations removed, original template restored
WARNING
Resetting deletes all customizations. Export your custom template before resetting if you want to keep changes.
Invoice Status
Invoice status tracks payment state:
| Status | Description |
|---|---|
| Pending | Payment not yet received |
| Paid | Payment completed |
| Canceled | Invoice/order canceled |
Status is synchronized with:
- Order status
- Payment status
- Refund state
Tax Information on Invoices
Tax Breakdown
Invoices display tax information:
Per-item tax:
- Tax amount for each product line
- Tax rate applied
- Tax class name
Total tax:
- Subtotal by tax rate
- Tax class names
- Combined tax total
Tax components:
- GST/VAT breakdown
- Regional tax components
- Multiple tax rates summed
Customer Tax ID
If customer provides business tax information:
- Company tax code/VAT number
- Company name
- Company address
- Company email
This information appears in dedicated section on invoice.
Multi-Currency Invoices
Invoices display amounts in the currency used for the order:
- Order currency detected from customer session
- All amounts shown in that currency
- Currency symbol and code included
- Exchange rates (if applicable) stored with order
Invoice Management
Editing Invoices
Invoices are automatically generated from order data and cannot be directly edited.
To modify invoice:
- Edit the source order details
- Delete the invoice
- Regenerate invoice from order
Deleting Invoices
To delete an invoice:
- Navigate to
Ecommerce->Invoices - Find invoice to delete
- Click Delete icon
- Confirm deletion
WARNING
Deleting an invoice removes it permanently. You can regenerate from the order if needed.
Regenerating Invoices
To regenerate an invoice:
- Delete existing invoice (if any)
- Open order details
- Click Generate Invoice button
- New invoice created with current order data
Email Delivery
Invoices can be sent to customers via email:
Order Confirmation Email
Include invoice in order confirmation:
- Navigate to
Settings->Email - Find Order Confirmation template
- Edit template
- Add invoice link using the
invoice_urlvariable - Or attach PDF using the
invoice_pdfattachment
Invoice Email Template
Create dedicated invoice email:
- Create new email template
- Subject: "Invoice for Order #
order.code" - Body: Invoice details and download link
- Attach PDF invoice
- Send manually or via automation
Printing Invoices
Single Invoice
To print an invoice:
- View invoice in browser
- Click Print button
- Browser print dialog opens
- Select printer or save as PDF
- Print/save
Bulk Printing
To print multiple invoices:
- Export invoices list to CSV
- Use third-party tool for bulk PDF generation
- Or print individually from invoice list
Invoice Security
Invoices include security features:
Access Control:
- Admin authentication required
- Customer access via order token
- Time-limited access URLs
Data Protection:
- Secure PDF generation
- Encrypted customer data
- HTTPS delivery required
Privacy:
- Customer-specific information
- No public listing of invoices
- Restricted search/filtering
Troubleshooting
Invoice Not Generating
Check:
- Order is finished (
is_finished = true) - Invoice doesn't already exist for order
- Automatic generation is enabled (if expecting automatic)
- No errors in Laravel logs
Invoice Not Visible to Customer
Verify:
- Invoice has been generated
- Order is confirmed (if "disable until confirmed" is on)
- Order is not canceled
- Customer has correct order URL/token
Wrong Company Information
Update:
- Check
Settings->Generalfor basic info - Check
Ecommerce->Settings->Taxfor tax ID - Regenerate invoice after updating
- Clear application cache
Template Customization Not Showing
Ensure:
- Customization was saved
- Cache is cleared (
php artisan cache:clear) - Correct template is selected
- Browser cache is refreshed
PDF Download Failing
Check:
- DomPDF library is installed
- PHP memory limit is sufficient
- Temp directory is writable
- No logo image loading errors
Advanced Features
Custom Invoice Numbers
For sequential numbering across years:
- Set prefix with year:
2024- - Numbers continue:
2024-001,2024-002 - Change prefix annually:
2025-
Invoice API
Access invoices programmatically:
use Botble\Ecommerce\Models\Invoice;
use Botble\Ecommerce\Facades\InvoiceHelper;

// Get invoice
$invoice = Invoice::find($id);

// Generate invoice
InvoiceHelper::store($order);

// Download PDF
InvoiceHelper::downloadInvoice($invoice);

// Stream PDF
InvoiceHelper::streamInvoice($invoice);
Webhooks
Send invoice data to external systems:
Configure at Ecommerce -> Settings -> Webhooks:
- Trigger: Invoice created
- Payload: Invoice data JSON
- Endpoint: Your integration URL
Best Practices
Enable automatic generation - Ensures all orders have invoices
Customize company info - Complete all company fields for professional appearance
Test templates - Preview customizations before deploying
Use proper branding - Upload high-quality logo, match brand colors
Include payment terms - Add payment terms to template if needed
Archive invoices - Export invoice data periodically for accounting
Keep templates simple - Avoid complex layouts that may not render properly
Test PDF generation - Verify PDFs render correctly on different devices
Backup customizations - Save custom template code before updating
Monitor errors - Check logs for invoice generation failures
Frequently Asked Questions
Can I edit an invoice after generation?
No. Invoices reflect order data at generation time. Edit the order and regenerate the invoice if needed.
Are invoices legally valid?
Invoices include all standard required information. Check with your accountant for specific legal requirements in your jurisdiction.
Can I create invoices without orders?
No. Invoices are always linked to orders. Create an order first, then generate its invoice.
How do I add my tax ID to invoices?
Add it at Ecommerce -> Settings -> Tax. It will appear in the company information section.
Can customers print invoices?
Yes. Customers can view and print invoices from their order details page.
What format are invoices stored in?
Invoices are stored as database records. PDFs are generated on-demand when viewed or downloaded.
Can I change invoice numbers?
Invoice numbers are auto-generated and cannot be changed after creation. Set prefix/suffix before generating.
How long are invoices kept?
Invoices are kept indefinitely unless manually deleted. They remain as long as the order exists.
Related Documentation
- Order Management - Managing orders that generate invoices
- Tax Configuration - Setting up tax rates shown on invoices
- Payment Gateways - Payment methods displayed on invoices